
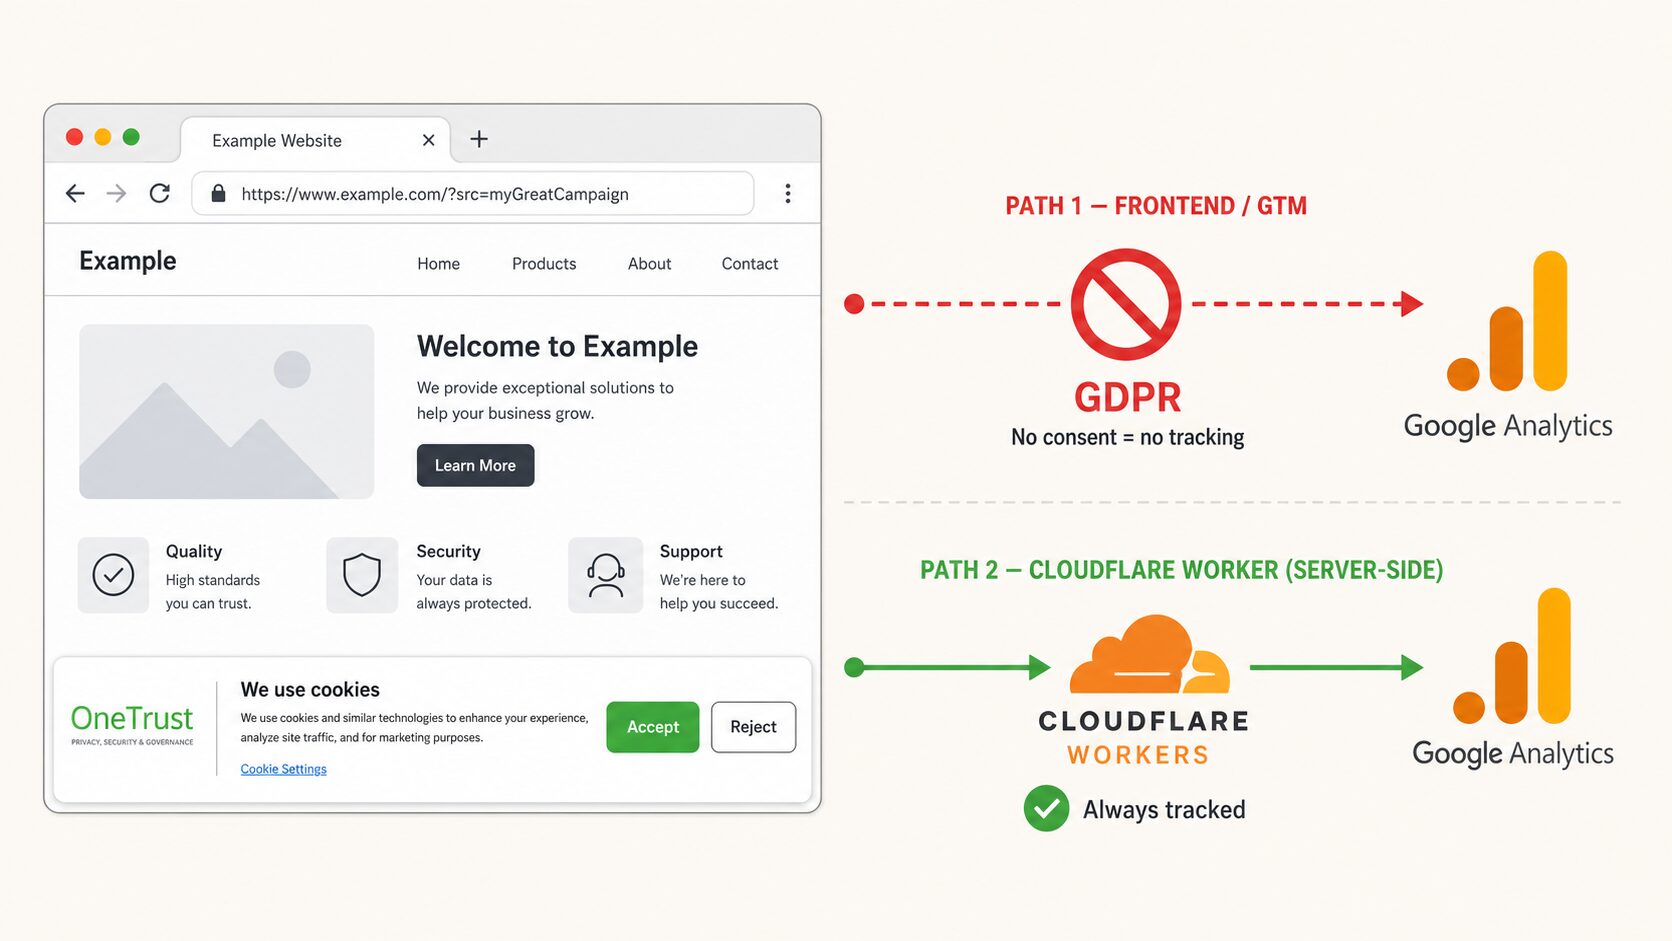
One of the most challenging problems in web analytics today is measuring campaign traffic before a visitor accepts cookies. In an opt-in setup with tools like OneTrust or CookieYes, Google Tag Manager and GA4 often cannot record campaign events until consent is granted, which creates a blind spot exactly where marketers most want visibility.
Why this is difficult
On paper, the usual answer is “track it on the backend.” In reality, that is often much harder than it sounds. Many websites look like a single product to the visitor, but behind the scenes they are stitched together from several systems: a CMS, an e-commerce stack, a Node.js app, Java services, and separate APIs. Those systems frequently do not share a common session or unified data layer, so implementing consistent campaign tracking across all of them becomes expensive and fragile.
This raises a more interesting question: what if tracking happens before the request even reaches the origin server?
Why Cloudflare is a strong fit
Cloudflare sits in front of the entire stack, which makes it a practical layer for request-based measurement and routing. It also offers lightweight products that can be enabled quickly, including Google Tag Gateway, Page Rules, and Workers.
Google Tag Gateway
Google Tag Gateway lets Google tags load from your own domain instead of Google-owned domains, and measurement events are proxied through your domain as well. This can improve measurement signal recovery, strengthen first-party delivery, and reduce data loss from blockers that target standard Google tag domains.
It can also improve performance because tags are served through Cloudflare’s edge infrastructure instead of requiring an extra fetch from Google domains. Setup is handled from the Google tag or GA4 admin flow by connecting Cloudflare and selecting the relevant domain.
Key benefits at a glance:
- Ad blocker resistance — blocklists targeting
googletagmanager.comandgoogle-analytics.comno longer interrupt tag loading - First-party cookies — tags set through your own domain are treated as first-party, which extends cookie lifetime in Safari and other ITP-restricted browsers
- Faster script delivery — Cloudflare caches the tag script at edge nodes close to visitors
- Better conversion signals — Google reports improved measurement resilience in environments affected by blockers.
Setup is handled directly from the GTM or GA4 admin by connecting Cloudflare and selecting the relevant domain — no manual code changes needed.
Page Rules and Workers
Cloudflare Page Rules are useful for simple redirects. Cloudflare Workers add programmable logic at the edge: code can inspect the request, branch on URL parameters, send analytics events, and redirect the visitor — all before the origin server is involved.
This is the primary architectural advantage: logic runs before WordPress, before the app server, and before browser-side consent prevents client-side tags from firing.
This approach complements rather than replaces Google Consent Mode.
The Original Setup
In this case, a QR code printed on T-shirts and a car sent users to a campaign URL. The first version used a Cloudflare Page Rule to redirect traffic from:
https://www.zwierzetadetektywi.pl/?src=myGreatCampaignto a dedicated landing page. Google Tag Manager then looked for the ?src parameter and fired a src_tracking event into GA4.
That worked only when the visitor accepted cookies. Without consent, the banner still allowed the user to browse the site freely — there was no blocking overlay — so GTM never properly recorded the campaign hit. In practice, QR scans were happening, but GA4 was missing a meaningful share of them.
An Improved Architecture
The better solution was to move campaign tracking to Cloudflare Workers and send the event directly to GA4 using the Measurement Protocol. This means the campaign hit can be recorded at the edge, before the request is processed by WordPress and without depending on browser-side consent at all.
The request flow is as follows:
QR scan
  -> Cloudflare Worker checks URL and ?src parameter
  -> Worker checks KV: has this IP sent an event in the last 60s?
  -> Worker sends src_tracking to GA4 via Measurement Protocol (server-side)
  -> Worker redirects visitor to the landing page (preserving ?src)
  -> WordPress renders the page
  -> GTM can still fire later if the user accepts cookies (backup)
This keeps campaign reporting centralized in GA4.
GA4 receives the server-side campaign event regardless of consent, while browser-side analytics can still continue after consent for full session measurement.
Implementation step by step
Step 1: Create the Worker Project
npm install -g wrangler
npx wrangler login
mkdir qr-tracker && cd qr-tracker
npm init -y
mkdir src
Step 2: Create a KV Namespace for Rate Limiting
bashnpx wrangler kv namespace create "RATE_LIMIT"
# Copy the returned id into wrangler.toml
Step 3. wrangler.toml
name = "qr-tracker"
main = "src/index.js"
compatibility_date = "2024-01-01"

[[routes]]
pattern = "yourdomain.com/landing-qr-koszulka/*"
zone_name = "yourdomain.com"

[[kv_namespaces]]
binding = "RATE_LIMIT"
id = "your_kv_id"
preview_id = "your_kv_id"
Step 4. src/index.js
const RATE_LIMIT_SECONDS = 60;

export default {
  async fetch(request, env, ctx) {
    const url = new URL(request.url);
    const src = url.searchParams.get('src');

    if (src) {
      // Fire-and-forget — does not block the redirect
      ctx.waitUntil(maybeTrack(src, request, env));
    }

    const targetUrl = new URL('https://www.yourdomain.com/landing-qr-koszulka/');
    if (src) targetUrl.searchParams.set('src', src);

    return Response.redirect(targetUrl.toString(), 302);
  }
};

async function maybeTrack(src, request, env) {
  const ip = request.headers.get('CF-Connecting-IP') ?? 'unknown';
  const kvKey = `rl:${ip}:${src}`;
  const lastSeen = await env.RATE_LIMIT.get(kvKey);

  if (lastSeen) return; // already tracked this IP within the window

  await env.RATE_LIMIT.put(kvKey, '1', {
    expirationTtl: RATE_LIMIT_SECONDS
  });

  await sendGA4Event(src, request, env);
}

async function sendGA4Event(src, request, env) {
  const payload = {
    client_id: `qr_${src}`,
    non_personalized_ads: true,
    events: [{
      name: 'src_tracking',
      params: {
        src,
        campaign_source: 'qr_code',
        country: request.cf?.country ?? 'unknown',
        city: request.cf?.city ?? 'unknown',
        engagement_time_msec: '100'
      }
    }]
  };

  try {
    const res = await fetch(
      `https://www.google-analytics.com/mp/collect?measurement_id=${env.GA4_MEASUREMENT_ID}&api_secret=${env.GA4_API_SECRET}`,
      {
        method: 'POST',
        headers: { 'Content-Type': 'application/json' },
        body: JSON.stringify(payload)
      }
    );
    if (!res.ok) console.error(`GA4 MP error: ${res.status}`);
  } catch (err) {
    console.error('GA4 fetch failed:', err);
  }
}
Step 5. Where to Find the GA4 API Secret
The Measurement Protocol API secret lives in GA4 under:
Admin → Data Streams → choose your web stream → Measurement Protocol API secrets → Create
The secret value is shown only once at creation time — copy it immediately. Store it as an encrypted Wrangler secret, never hardcode it in the project files.
npx wrangler secret put GA4_MEASUREMENT_ID
npx wrangler secret put GA4_API_SECRET
npx wrangler deploy
Why Measurement Protocol Instead of the Data API?
Google provides several APIs for Analytics, and they are often confused.
The Measurement Protocol is designed to send events into GA4, whereas the Google Analytics Data API is used to query and report on data that has already been collected. Since the goal here is to record a campaign event before browser-side analytics can run, the Measurement Protocol is the appropriate choice.
Step 6. Local Testing
Create a .dev.vars file (do not commit to git):
GA4_MEASUREMENT_ID=G-XXXXXXXXXX
GA4_API_SECRET=your_secret
Then run locally:
npx wrangler dev
curl "http://localhost:8787/test?src=test123"
To validate the payload structure without writing real data, temporarily replace mp/collect with debug/mp/collect in the fetch URL. GA4 will return a JSON response describing any validation errors.
Step 7: Viewing the Data in GA4
| Location | Delay | Notes |
|---|---|---|
| GA4 → Realtime → Events | ~typically within a minute | src_tracking visible immediately after deploy |
| GA4 → Admin → DebugView | Instant | Only with debug endpoint — for testing only |
| GA4 → Explore (Free Form) | ~24 hours | Dimension: Event parameter: src |
| Looker Studio | ~24 hours | Persistent historical dashboard |
In Explore, build a Free Form report:
- Dimension: Event name,
src(custom event parameter) - Metric: Event count
- Filter: Event name =
src_tracking
Rate Limiting — Protection Against Duplicates and Bots
Without protection, every page refresh, bot crawl (depending on your Cloudflare Bot Management configuration), or repeated QR scan would generate a new GA4 event, inflating campaign numbers.
The solution is a KV-based rate limiter using the visitor’s IP address and campaign source as the key: rl:<IP>:<src>. The logic is simple:
- Key exists in KV → skip the event, redirect as normal
- Key does not exist → record the event, save the key with a TTL, redirect
Keys expire automatically after the configured TTL, although expiration is eventually consistent across the edge network. There is no cleanup job, no cron, no extra code needed.
The optimal TTL depends on the use case:
| Scenario | Recommended TTL | Rationale |
|---|---|---|
| QR code on physical materials | 60 seconds | Re-scans within a minute are almost always the same person |
| Email campaign link | 30 minutes | User may open the link multiple times |
| Paid campaign (Google Ads, Meta) | 24 hours | One event per day per IP |
| Unique invitation link | 7 days | One event per user per week |
Changing the window is a one-line edit: const RATE_LIMIT_SECONDS = 60.
Limitations of Per-IP Rate Limiting
Per-IP rate limiting has one known limitation: users behind the same NAT (a shared office network, a shopping mall Wi-Fi, a mobile carrier) share the same IP address. For a QR campaign on a T-shirt, this is an acceptable trade-off — the primary goal is counting unique scan events, not every individual tap.
The alternative would be rate limiting per browser fingerprint (User-Agent + Accept-Language + screen resolution) or setting a first-party cookie on the first visit — but both require consent and defeat the entire purpose of this solution. Per-IP remains the best compromise in a cookie-free tracking model.
GDPR Compliance
This solution does not transmit any personal data. The GA4 event contains:
- The campaign parameter (
src) — identical for everyone who scans the same code - Country and city from Cloudflare — aggregated geolocation, not individually identifying
client_id: qr_${src}— fixed per campaign, not per individual user
The client_id is intentionally fixed per campaign because the implementation is designed for aggregate campaign counting rather than user-level analytics.
The visitor’s IP address is never sent to GA4. The rate limiting key based on IP lives exclusively in Cloudflare KV with a TTL of 60 seconds and is never logged or forwarded anywhere. The visitor’s IP address is processed transiently inside Cloudflare Worker exclusively for short-term rate limiting. It is never forwarded to GA4 or stored beyond the configured TTL.
Depending on your legal interpretation and jurisdiction, this may still constitute processing of personal data under GDPR, although the implementation minimizes data retention and avoids transferring personal identifiers to analytics platforms.
Why this approach scales
The tracking logic lives in one place — the Cloudflare Worker — and is completely independent of the backend. It does not matter whether the destination is WordPress, Node.js, Java, or a combination. The Worker runs before any of them, so the same solution covers the full stack without touching each system individually.
This is not a replacement for full consent-aware analytics. It is a targeted fix for a specific and common gap: campaign entry points that arrive before the visitor has made a consent choice. For QR codes, short links, and parameter-based source tracking, moving that first event to the edge closes the blind spot reliably and without added complexity.
Why Not Server-side Google Tag Manager?
Many analytics engineers might ask why not simply use Server-side Google Tag Manager (sGTM). While sGTM is an excellent solution for many use cases, it solves a different problem.
For this scenario, Cloudflare Workers have several practical advantages:
| Cloudflare Worker | Server-side GTM |
|---|---|
| No additional infrastructure | Requires a server or Cloud Run/App Engine container |
| Executes in milliseconds at the edge | Additional network hop introduces higher latency |
| Generous free tier | Infrastructure costs may apply |
| Can intercept requests before they reach the origin | Processes requests only after they are forwarded to the tagging server |
For lightweight campaign tracking, URL redirects, and request inspection, a Worker is often the simplest solution. Server-side GTM becomes a stronger choice when you need vendor integrations, complex tag orchestration, or server-side enrichment of analytics data.
Summary
| Aspect | Page Rule + GTM (before) | Worker + Measurement Protocol (after) |
|---|---|---|
| Tracking without cookies | ❌ Not possible | ✅ Near-complete tracking |
| Dependency on CMS/backend | Required | None |
| Implementation time | Hours | A few hours |
| Cost | Cloudflare Free | Cloudflare Workers Free tier |
| Ad blocker resistance | Low | High (server-side) |
| Duplicate protection | None | KV rate limiter with TTL |
| Data in GA4 | Partial (consent only) | Complete |
Cloudflare as an infrastructure layer in front of the entire stack is an approach that scales to any service — whether the backend is WordPress, Node.js, Java, or a combination of all three. The Worker does not need to know anything about what lies behind it.
Rather than replacing traditional client-side analytics or Consent Mode, this approach complements them by ensuring that the initial campaign entry point is captured reliably at the network edge, independent of browser-side consent.
UPDATE 09/2026 – lessons learned
Cloudflare Worker routes cannot be filtered by query parameters such as ?src=campaign-name; route matching is based on the hostname and URL path. If a Worker is attached to example.com/*, it will be invoked not only for the QR landing-page request but also for CSS, JavaScript, images, fonts, and other site resources.
For QR codes already printed with URLs like https://example.com/?src=sometext, the practical approach is to create a Cloudflare Redirect Rule that detects src on the homepage and redirects the visitor to a dedicated tracking path, for example /_qr-track?src=sometext. Attach the Worker only to example.com/_qr-track*. The Worker can then record the scan and redirect the visitor to the final landing page. This adds one extra redirect, but prevents all regular site assets from invoking the Worker and keeps tracking isolated from the WordPress/WooCommerce site traffic.