
Introduction
When you commute every day from the same bus stop, checking departure times quickly becomes a routine annoyance. Instead of calmly walking out of the house, you end up opening an app, waiting for it to load, tapping through a few screens, and only then seeing when the next bus leaves. This costs precious seconds every single time.
In my case, I almost always travel from the same stop, on the same line, in the same direction. The data I need is extremely simple: when is the next bus, and how many minutes do I have. The problem is that traditional apps are designed to serve many scenarios, not one very specific, repetitive use case. They are often overloaded with features, maps and extra options which slow you down when all you want is a single number.
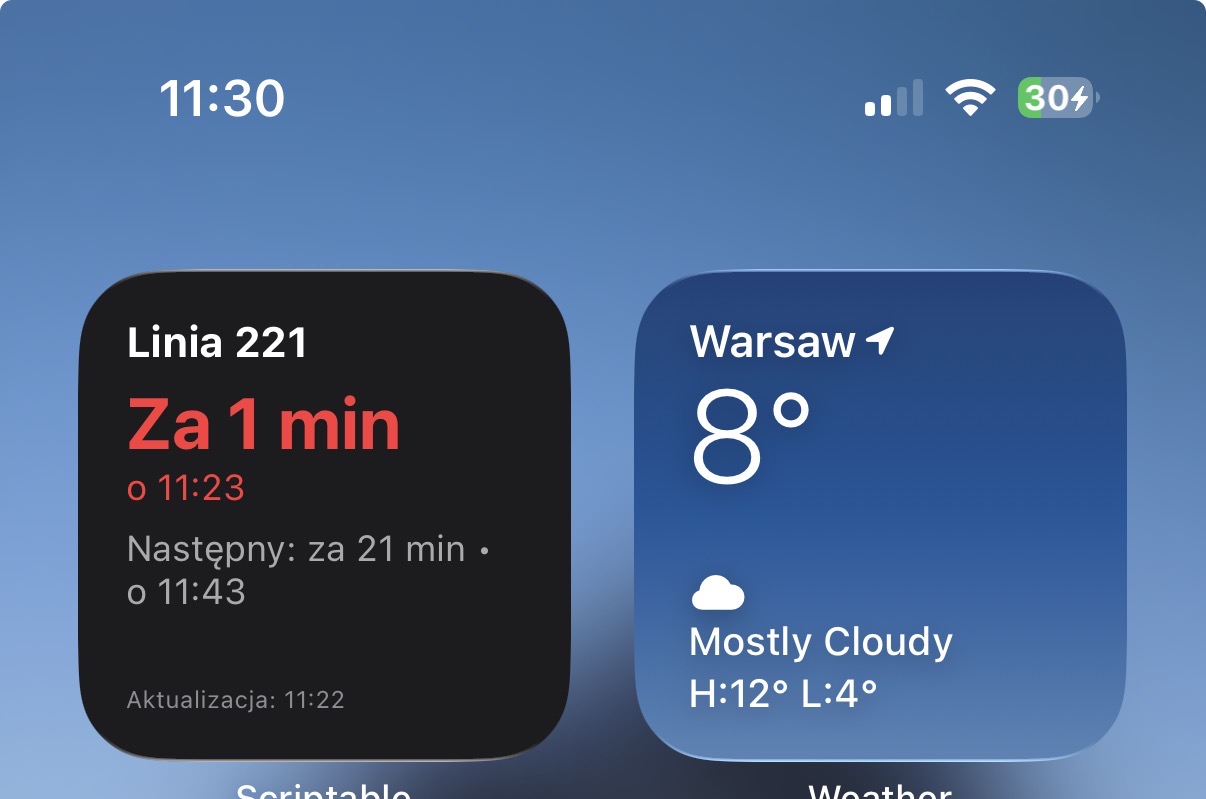
That is exactly where a widget shines. By creating a custom widget using Scriptable, I can have the most important information on my iPhone Home Screen, always visible and always focused on my stop and my bus line. No need to open an app, no waiting for loading screens – just glance at the screen and immediately see “In 7 min” and the exact departure time.
This article walks through building such a widget step by step. We will fetch timetable data for a specific Warsaw bus stop from the city API, calculate the nearest departure, and display it in a compact, readable widget on the Home Screen. Along the way, we will also highlight the main limitation of this approach: widgets do not refresh in real time and you cannot fully control the refresh schedule.
Step 1: Install Scriptable and prepare the API
- Install the Scriptable app from the App Store on your iPhone.
- Sign in to the Warsaw city API portal and generate your own API key (
apikey) for the timetable service. - Note the parameters we will use in this example:
busstopId– stop ID (e.g.6089)busstopNr– stop post number (e.g.03)line– bus line number (e.g.221)
A sample URL (with your API key at the end) looks like this:
https://api.um.warszawa.pl/api/action/dbtimetable_get/?id=e923fa0e-d96c-43f9-ae6e-60518c9f3238&busstopId=6089&busstopNr=03&line=221&apikey=API_KEY
Step 2: Create a new Scriptable script
- Open the Scriptable app.
- Tap the “+” icon in the top‑right corner to create a new script.
- Name the script, for example:
Bus 221 Dw. Gdański. - In the editor, delete any default code and paste the script below.
Full widget script
javascript// 🚌 Widget: Next bus departure (Scriptable)
// SPDX-License-Identifier: MIT
// Copyright (c) 2026 https://dev.orpi.pl
// Uses Warsaw ZTM API
// Put your API key into API_KEY
const API_KEY = "YOUR_API_KEY_HERE"; // <= INSERT YOUR KEY HERE
const STOP_ID = "6089";
const STOP_NR = "03";
const LINE = "221";
const url = `https://api.um.warszawa.pl/api/action/dbtimetable_get/?id=e923fa0e-d96c-43f9-ae6e-60518c9f3238&busstopId=${STOP_ID}&busstopNr=${STOP_NR}&line=${LINE}&apikey=${API_KEY}`;
// ---- FETCH DATA FROM API ----
async function fetchData() {
const req = new Request(url);
const data = await req.loadJSON();
// data.result is an array of arrays of { key, value } objects
return data.result.map(e =>
e.find(x => x.key === "czas").value
);
}
// ---- FIND NEXT DEPARTURES ----
function getNextDepartures(times) {
const now = new Date();
const nowMins = now.getHours() * 60 + now.getMinutes();
const departures = times.map(t => {
const [h, m, s] = t.split(":").map(Number);
let mins = h * 60 + m;
if (mins < nowMins) mins += 24 * 60; // if time already passed, treat as tomorrow
return {
time: t,
diff: mins - nowMins
};
}).sort((a, b) => a.diff - b.diff);
return departures.slice(0, 2);
}
// ---- BUILD THE WIDGET ----
async function createWidget() {
const list = new ListWidget();
list.backgroundColor = new Color("#1c1c1e");
const times = await fetchData();
const next = getNextDepartures(times);
if (next.length === 0) {
const title = list.addText(`Line ${LINE}`);
title.font = Font.boldSystemFont(14);
title.textColor = Color.white();
const noData = list.addText("No data");
noData.font = Font.systemFont(12);
noData.textColor = Color.red();
return list;
}
const nextBus = next[0];
const secondBus = next[1];
const minutes = Math.round(nextBus.diff);
// Color based on time left
let color = Color.green();
if (minutes <= 3) color = Color.red();
else if (minutes <= 12) color = Color.orange();
// Header
const title = list.addText(`Line ${LINE}`);
title.font = Font.boldSystemFont(14);
title.textColor = Color.white();
list.addSpacer(4);
// 1st line: "In X min" (big, colored)
const mainText = list.addText(`In ${minutes} min`);
mainText.font = Font.boldSystemFont(28);
mainText.textColor = color;
// 2nd line: departure time "at HH:MM" (small, gray)
const departureTime = nextBus.time.slice(0, 5); // "HH:MM"
const timeText = list.addText(`at ${departureTime}`);
timeText.font = Font.systemFont(12);
timeText.textColor = Color.lightGray();
list.addSpacer(6);
// Second departure (if exists)
if (secondBus) {
const sec = Math.round(secondBus.diff);
const secondDepartureTime = secondBus.time.slice(0, 5);
const secondText = list.addText(
`Next: in ${sec} min • at ${secondDepartureTime}`
);
secondText.font = Font.systemFont(12);
secondText.textColor = Color.lightGray();
}
list.addSpacer();
// Update timestamp
const now = new Date();
const df = new DateFormatter();
df.useShortTimeStyle(); // e.g. "11:24"
const updatedAt = df.string(now);
const footer = list.addText(`Updated: ${updatedAt}`);
footer.font = Font.systemFont(8);
footer.textColor = Color.gray();
// Suggest refresh in 1 minute
const nextRefresh = new Date(Date.now() + 60 * 1000);
list.refreshAfterDate = nextRefresh;
return list;
}
// ---- RUN ----
let widget = await createWidget();
if (config.runsInWidget) {
Script.setWidget(widget);
} else {
widget.presentSmall();
}
Script.complete();
You can now tap the play button inside Scriptable to preview the widget content.
Step 3: How the script works
A short explanation of the core logic:
fetchData()sends an HTTP request to the Warsaw city API and returns a list of departure times in"HH:MM:SS"format.getNextDepartures(times)converts these times into minutes since midnight, compares them with the current time and picks the two closest departures (next and following), handling the wrap‑around at midnight.createWidget()builds the widget UI:- header with the line number,
- big, colored “In X min” text,
- a smaller “at HH:MM” line,
- one line for the following departure,
- a tiny “Updated: HH:MM” timestamp at the bottom.
The result is a compact panel on your Home Screen that tells you exactly how much time you have and at what time the bus leaves.
Step 4: Adding the Scriptable widget to your Home Screen
Once the script works inside Scriptable, you can place it on your Home Screen:
- Go back to the iPhone Home Screen.
- Long‑press on an empty area until the icons start to jiggle (edit mode).
- Tap the “+” button in the top‑left corner.
- In the widget list, find Scriptable (you can use the search field).
- Choose the Small widget size for this example.
- Tap “Add Widget” and place it where you want.
- Long‑press the new Scriptable widget and choose “Edit Widget”.
- In the “Script” field, select the script you created (
Bus 221 Dw. Gdański).
After a brief moment the widget will run your script, call the API and render the timetable.
Step 5: Refreshing and the main limitation
One of the most important things to understand is that widgets on iOS do not refresh in real time, and you cannot force them to update exactly when you want. The system decides when to update widgets based on its own internal policies such as battery level, power saving modes, user activity, and background execution limits.
The line:
javascriptlist.refreshAfterDate = nextRefresh;
only suggests to the system that you would like the widget to refresh roughly one minute later. It is a hint, not a guarantee. iOS may decide to delay updates or batch them together to save battery. In practice, the widget will refresh automatically every few to several minutes, but you cannot rely on it as a live countdown that ticks every second.
You can manually trigger an update by tapping the widget (if it is configured to open Scriptable), running the script, and going back to the Home Screen so it redraws. Still, this doesn’t change the fact that iOS has the final word on background refresh timing.
Disclaimer: the biggest disadvantage of this solution is exactly this: the widget is not a live, continuously updating display. It shows snapshots that are periodically refreshed by iOS, and the exact refresh schedule is controlled by the system, not by your code.
Step 6: Next steps and real‑time data
The example above uses a static timetable endpoint, but many public transport providers also expose real‑time vehicle positions and live departure predictions in their APIs. Once you have this kind of real‑time data available, you can plug it into the same Scriptable approach and show, for example, actual delays or the current position of the bus along the route.
The next natural step for this project is to read the real‑time bus position from the available API and replace or complement the static timetable with live information. You could show whether the bus is early or late, or how many stops away it currently is.
The general idea goes much further than public transport: as long as you have an API that returns the data you care about, you can turn almost any information into a custom widget. Weather from your own station, server uptime, crypto prices, smart‑home sensor data – if it’s accessible over HTTP, Scriptable lets you transform it into a small, focused panel on your iPhone Home Screen.
Would you like a follow‑up version of this article focused specifically on consuming a real‑time “vehicle position” API and integrating it into this widget?